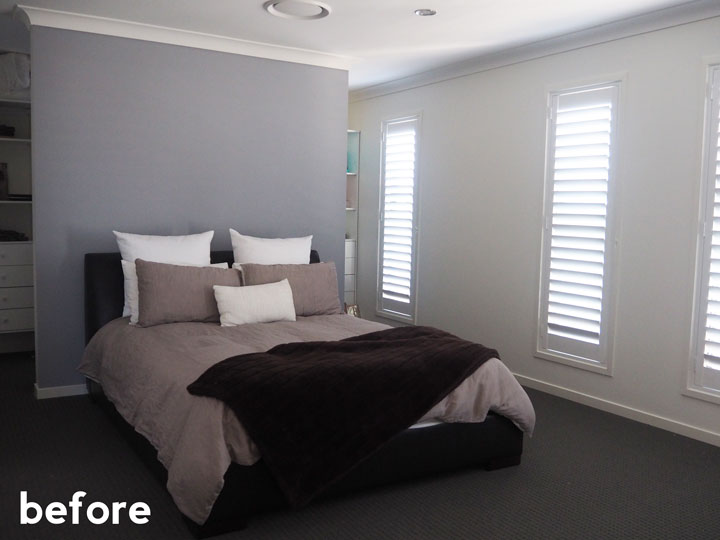
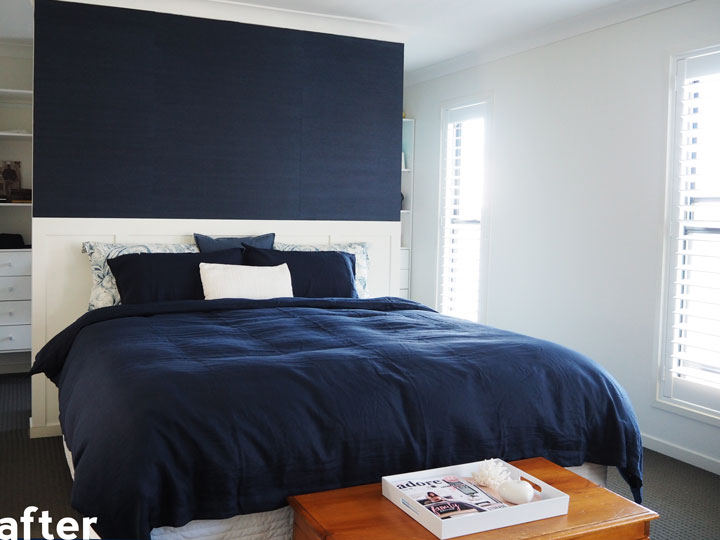
When we moved into this house a year ago, it came with a fairly lengthy list of things that we wanted to do to it. Nothing major, just lots of little things that would add our own touch to it and make it our home.
One of those things was to do something with the feature wall in the master bedroom, which was more ‘meh’ than feature!

Way back in May 2015 I purchased a double roll of the most gorgeous Indigo grasscloth, or seagrass as it’s also known, wallpaper from Hamptons Style.
Finally, in February 2016, Guns and I started and completed the job!
Now obviously what I mean by that last sentence is, I spent a fair bit of time researching grasscloth/seagrass wallpaper on Pinterest while Guns actually did ALL of the manual labour. Although I did make one trip to Bunnings with him to help select the timber for the board and batten part of things.
Of course I had the very important job of shopping for a new bed AND linen, which is slightly more stressful than you might think, so I think it’s fair to say that the whole process really was a joint effort!
How To Hang Grasscloth Wallpaper and Board and Batten Wainscoting/Paneling
Step One: Paint over any existing paint
This step is only necessary if you’re going to do the board and batten wainscoting/paneling part. If you’re just wallpapering, you get to skip this step. LUCKY!
This took Guns three coats of white paint. We used the same colour as the walls, which the previous owners of the house kindly left behind for us.
Let the paint dry completely before going any further. This will take 24-48 hours depending on how hot or cold it is where you live.
Step Two: Watch numerous You Tube tutorials on how to install grasscloth Wallpaper and then give it a crack yourself.

Guns Top Tips For Installing Grasscloth Wallpaper Are:
- Measure the width of the wall and work out how many pieces of grasscloth wallpaper you will need to cover the wall. We needed three pieces. Then cut each piece so they are all equal widths, otherwise you will end up with two wide pieces and one smaller piece at the end.
- It’s heavier than normal wallpaper, so an extra pair of hands might be helpful, especially when hanging it. Guns had a Mars Bar and completed 3.5 push ups before he’d started, so obviously didn’t need any help, but if he did, it would’ve been when he was getting the wallpaper up onto the wall.
- The edges of the wallpaper might need a bit of trimming once you’ve applied it to the wall. If you’re a crafty type you’ll probably find this easy. Guns is more of a craft beer drinker so he struggled with it at first, but by the third piece he nailed it!
And now for the paneling!
Step Three: Prep The Timber
While the wallpaper is drying you will need to get your prep on!
Measure the length required for the timber, cut it and paint it. Wait for it to dry and then it’s time for the final steps to begin.
Step Four: Attach the timber to the wall
We left the skirting as it was (nobody is going to see it as the bed will pretty much cover it) and attached the top rail using glue and nails.
Guns then measured the distance between the upright boards, spacing them evenly along the wall and securing them with masking tape. He attached them to the wall with liquid nails and actual nails.
The nails used were small gauge, bullet heads which Guns hammered underneath the surface of the timber with a nail punch. He then filled the holes with some sort of Selly’s product which Guns uses all the time yet doesn’t know the name of (he calls it bog filler, but that’s not its actual name obviously. Please don’t go to Bunnings and ask for bog filler!) Finally, Guns sanded it back and gave each upright a final coat of paint.
Step Five: Dress the bed, take 47 photos for Instagram, use one (no filter), write a blog post about the whole process and resist the urge to touch the wallpaper every time you walk past the wall.
The Details:
Wallpaper purchased from Hamptons Style
Timber, paint, glue, nails, tape purchased from Bunnings
Joli Paisley pillow cases purchased from Pottery Barn Brisbane
Denim cushion cover and feather insert purchased from IKEA Logan
Abbotson Linen Tailored Quilt Cover & Pillow Cases in Midnight purchased from Sheridan (purchased on sale)
White cushion from Myer several years ago
Sealy Hotham King Bed & Base purchased from Snooze at Logan Mega Centre during their sale
Wardrobe built ins already in place when we purchased the house. For a peek inside, head to this post: How To Declutter Your Wardrobe Like A Boss


Leave a Reply